Rick Deremiah, P.E., is technical resources engineering manager for Hanson Pressure Pipe. Deremiah can be reached at [email protected].
undefinedConcrete pressure pipe (CPP) has a strong track record, with thousands of miles in the ground and some lines as old as 70 or 80 years or more. But ensuring CPP’s longevity, as with any engineered structure, relies on quality installation from the start. Luckily, proper installation is not difficult, so issues can be easily avoided with proper training and techniques.
One of the areas susceptible to human error is around the joints; unlike the pipe itself, in which internal steel components are encased in protective concrete, portions of the steel joint rings are exposed and therefore require grouting on site during installation. Failure to grout properly—whether due to lack of training or efforts to save costs—could leave the steel joint rings vulnerable. The same considerations should be taken with steel pressure pipe as well, the joints of which also are exposed and require proper grouting for protection.
First and foremost, always follow manufacturer guidelines for grouting joints. Manufacturers have conducted extensive research into grout mixtures, methods and amounts that will ensure proper protection of the steel joints. Along with installation recommendations, some manufacturers also provide jobsite training on all areas of CPP installation, including jointing.
What is Concrete Grouting?
Industry research into installation methods continues to hold that the best way to provide corrosion protection is to diaper and grout the joint on the outside. Portland cement grout is ideal for protecting the steel joints.
The grout’s primary function is to provide corrosion protection to the exposed metal components of the joint. In the case of a restrained joint (either a snap ring or harness clamp), the grout also provides additional structural benefit: The wet grout flows down and around the restrained joint components and can act as a variable-width shim between the clamp and the harness bars and serve to transfer axial thrust forces in compression. (Note: Pipe with restrained joints should not be pressurized until the joints have been grouted and the grout allowed to cure.)
Portland cement grout provides electrochemical protection. When steel is encased in a highly alkaline environment like grout, with high pH between 12.5 and 13.5, the surfaces of the steel are passivated—in other words, it prevents the steel from oxidizing. It is vital that proper procedures, including mix ratio, are followed. Contractors who try to save money by reducing the amount of Portland cement in the grout will lessen the alkalinity of the mix, which could cause corrosion in the joints a few decades after the pipeline is in the ground.
Mix the grout using one part ASTM C150 Type 1 or Type 2 Portland cement to not more than three parts clean sand with sufficient water to achieve a pourable consistency. The grout should look and pour like a thick cream. If it is too thick, it will not flow around the joint; if it is too thin, it may leak out of the diaper.
The Diapers
Concrete pressure pipe comes with accompanying diapers for joint installation. The two-ply diapers consist of a Typar synthetic fabric layer with a ¼-in. closed-cell foam lining, which provides an additional layer of protection. It is important that the diaper be carefully placed against the exterior surface of the pipe to ensure that it is flush, with no gaps or gathers. The diaper must be centered on the joint.
A pair of 5/8-in.-wide steel bands sewn into each edge are used to secure the diaper to the pipe exterior. The installer uses a stretching tool (normally part of the installation kit) to tighten the steel bands. Once the bands are pulled tight, a steel clip is crimped around the band ends to hold them in position. If the bands are not tight enough, they may slip or the diaper might leak.
The Pour
Carefully pour the mixed grout into the gap at the top of the diaper. Most contractors use plastic 5-gal buckets; a large funnel might be helpful.
The wet grout will flow down to the bottom of the diaper, which will begin to bulge out. It often is helpful to place some bedding material directly under the diaper at the bottom to support the weight of the wet grout. Take care to not push excessive amounts of bedding material under the diaper such that it is pushed up into the joint recess; this will impede the flow of wet grout. As the pouring proceeds, installers should inspect the diaper around the joint periphery to ensure that the grout is flowing all around. Ensure the bedding material does not have large rocks or debris that could tear the diaper or impact the nearby pipe.
For larger-diameter pipe, placing the grout in several lifts is helpful. The grout is allowed to take an initial set before subsequent lifts are added.
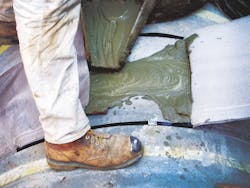
Once the diaper is full and wet grout is puddling at the gap at the top, apply a stiffer mix (perhaps the consistency of wet brick mortar) over the joint. Ensure that all metal joint components have at least 1 in. of coverage. Then fold the diaper flap over the gap and allow the grout to cure.
Backfilling operations can begin immediately after the diaper has been filled. When placing backfill around the filled diapers, take care to avoid damage to or displacement of the diapers.
Important Role
Grout application is one of the most important steps in concrete and steel pressure pipe installation, yet its importance can be underestimated. Equal weight and consideration must be given to the joints; failure to use the right mix of grout or follow pour recommendations may lead to problems down the road. Mistakes are easily avoidable by ensuring that your team understands all aspects of grout application and looks to the pipe manufacturer for field support and training.
Download: Here


